Hey there, and welcome to the world of seamless connectivity! In today's digital-first world—whether it's a bustling university campus, a lively retail store, or a secure corporate office embracing BYOD—a top-notch Wi-Fi network isn't just a nice-to-have; it's the very foundation of the user experience. But how do you make sure your network is always performing at its peak? The secret sauce is robust network monitoring. This isn't just about watching for outages. It's about proactively understanding performance, securing every connection, and delivering a flawless experience for every user, every time.
For all you folks running powerful Cisco and Meraki hardware, getting this right is even more crucial. When you pair Meraki's slick cloud-managed features with advanced Authentication Solutions like Captive Portals and innovative security measures like Identity Pre-Shared Keys (IPSK or EasyPSK), you're not just providing Wi-Fi; you're creating a smart, secure experience. A well-monitored network ensures these sophisticated systems work like a charm, giving everyone the secure, reliable access they need to be productive and happy.
This guide is here to give you more than just generic advice. We're diving deep into seven essential network monitoring best practices, packed with actionable insights specifically for managing sophisticated WIFI networks in the Education, Retail, and BYOD Corporate sectors. You’ll learn how to set up meaningful performance baselines, configure smart alerts, and plan for future growth. Let's get started on turning your network data into your greatest operational asset and becoming a true master of your Cisco Meraki environment.
1. Establish Clear Network Baselines and Performance Metrics
Effective network monitoring doesn't start with putting out fires, but with understanding your network's normal, everyday rhythm. This crucial first step, known as baselining, is all about measuring and recording your network's typical performance over time. Think of it as a detailed health check-up that tells you your network's vital signs, from bandwidth usage to how long it takes devices to connect. Without this benchmark, you're essentially flying blind, unable to tell a minor hiccup from a major meltdown until it's too late.
In a dynamic guest WIFI environment powered by Cisco Meraki, baselining is your best friend. It gives you the context you need to manage all the different user groups connecting through your Captive Portals. By setting a clear baseline, a sudden spike in latency or an unexpected drop in throughput is no longer a mystery; it's a clear, measurable sign that something's up. This proactive approach is a cornerstone of modern network monitoring best practices, letting you spot and fix issues before they ever spoil the user experience.

Why Baselining is Non-Negotiable
For any organization, from a busy university campus in the Education sector to a multi-location Retail chain, a baseline provides the data-driven foundation for smart network management. It flips your monitoring from a reactive, "fix-it-when-it-breaks" process to a proactive, performance-focused one.
Key Insight: A baseline turns raw network data into actionable intelligence. It's the difference between saying "the Wi-Fi feels slow" and "latency for BYOD devices has increased by 40% in the last hour, exceeding our established threshold."
Platforms like Splash Access enhance Meraki’s powerful data collection capabilities, offering visualization tools that make these baselines easy to understand. With advanced analytics, you can track key performance indicators (KPIs) over time, making proactive management a practical reality. For more information on leveraging data, you can explore details about advanced Wi-Fi analytics with Splash Access.
Practical Implementation and Actionable Tips
Creating a useful baseline requires more than just a quick snapshot of data. It calls for a systematic approach that fits your specific environment.
- Retail Chains: Establish baselines for guest WIFI usage during peak and off-peak hours. This ensures that essential systems, like Point of Sale (PoS) terminals, always have the bandwidth they need, even on the busiest shopping days.
- Education Campuses: A university can baseline WIFI data in dorms, lecture halls, and libraries. This helps anticipate and plan for high-traffic events, like registration periods or exam week, ensuring a stable connection for students and faculty.
- Corporate BYOD: Monitor baseline connection latency and throughput for employee-owned devices connecting via secure methods like EasyPSK. This helps enforce security and performance standards, making sure personal device usage doesn't compromise the corporate network.
To get started, follow these actionable tips:
- Collect Data Over Time: Gather performance data for at least 30 days. This period is long enough to capture daily, weekly, and monthly usage patterns, providing a robust and reliable average.
- Update Regularly: Your network isn't static. Re-evaluate and update your baselines quarterly or after any significant network change, such as deploying new Meraki access points or reconfiguring your captive portal authentication.
- Document Seasonal Variations: Acknowledge and document predictable fluctuations. For retailers, this means accounting for holiday shopping surges. For hotels, it could mean tracking occupancy rates during tourist season.
2. Implement Multi-Layered Monitoring Coverage
A truly resilient network isn't just watched from one spot; it's observed from every possible angle. Multi-layered monitoring means using tools and techniques across all network layers, from the physical hardware right up to the application level. This holistic approach gives you complete visibility into performance and security, making sure no single point of failure goes unnoticed. It’s about moving beyond just checking if a device is online and diving into the quality of the connections and the user experience itself.
In a sophisticated guest WIFI environment, this means looking beyond the signal strength of your Cisco Meraki access points. You also need to monitor the performance of your captive portal, the speed of user authentication through services like EasyPSK, and the application performance for authenticated users. This layered view is essential for diagnosing tricky issues. A slow WIFI experience could be caused by a saturated network link, a misconfigured captive portal, or a slow upstream application, and only multi-layered monitoring can nail down the true source. To effectively implement this, it's crucial to understand what cloud networking entails, as modern network infrastructure is deeply interconnected with cloud services.

Why a Holistic View is Critical
For any organization that relies on seamless connectivity, a single-layer view creates critical blind spots. A problem at the application layer can look like a "WIFI issue" to the end-user, sending IT teams on a wild goose chase. Multi-layered monitoring connects the dots, providing the context needed for quick and accurate troubleshooting.
Key Insight: Multi-layered monitoring transforms your diagnostic process from guesswork to a data-driven investigation. Instead of just knowing "the network is slow," you can determine that "authentication requests to the RADIUS server are timing out," immediately identifying the root cause.
Solutions like Splash Access build upon the Meraki infrastructure to provide this deeper insight, correlating data from user authentication with network health. This integration is a prime example of effective network monitoring best practices, giving administrators a complete picture of the user journey from connection to authentication and beyond. For a deeper dive into creating a robust infrastructure, you can explore strategies for building a more resilient network.
Practical Implementation and Actionable Tips
Adopting a multi-layered strategy doesn't have to be an all-or-nothing mission. You can implement it bit by bit, starting with your most critical systems and expanding from there.
- Retail Environments: Monitor physical AP connectivity, captive portal load times, and transaction success rates at the Point of Sale (PoS) application layer. This ensures the entire customer journey, from connecting to the guest WIFI to making a purchase, is smooth.
- Education Campuses: Track network layer latency in high-density lecture halls, session-layer performance for student authentication via EasyPSK, and application-level access to the learning management system (LMS). This guarantees students can connect, log in, and access course materials without a hitch.
- Corporate BYOD: Monitor device compliance at the data link layer, secure tunnel performance for corporate resources, and the responsiveness of critical business applications. This ensures that personal devices are both secure and productive on the corporate network.
Follow these tips to get started with multi-layered monitoring:
- Start with Critical Layers: Begin by monitoring the layers most critical to your operations. For guest WIFI, this often means the network, transport, and application layers, which directly impact the user experience.
- Use Unified Dashboards: Correlate data from different layers in a single, unified dashboard. This allows you to see the relationships between events, such as a spike in network latency causing increased application load times.
- Automate Correlation: Implement rules that automatically link alerts from different layers. For example, an alert about high CPU on a RADIUS server could be automatically correlated with an increase in authentication failures reported by your captive portal.
- Ensure Tool Interoperability: Use monitoring tools that can communicate and share data through APIs. Platforms like Meraki and Splash Access are designed to work together, providing a seamless flow of information for comprehensive analysis.
3. Deploy Strategic Network Monitoring Points
Knowing what to monitor is only half the battle; knowing where to monitor is what separates basic network awareness from true network intelligence. Strategic placement of monitoring points means positioning your tools, sensors, and collectors at critical spots to get the best possible view. This ensures you can see everything that matters without creating unnecessary network noise or leaving dangerous blind spots. It’s about being smart, deliberate, and efficient with your monitoring.
In a distributed network of Cisco Meraki access points, this practice is fundamental. Whether you're managing a sprawling university campus or a chain of Retail stores, you need to understand traffic flow not just at the core, but at the edges where users connect. By strategically monitoring key network segments, you can isolate performance issues related to captive portal authentication, application usage, or specific device types, turning a complex environment into a manageable one. This is a core component of effective network monitoring best practices, giving you the end-to-end visibility needed to guarantee a seamless user experience.
Why Strategic Placement is Crucial
For any organization relying on WIFI, from hotels to corporate offices, the strategic deployment of monitoring points ensures that your data is relevant and actionable. It stops you from drowning in a sea of useless alerts while missing the subtle signs of a brewing problem. This targeted approach focuses your attention on the network paths that have the biggest impact on performance and security.
Key Insight: Monitoring everything is not the same as monitoring what matters. Strategic placement gives you a high-definition view of your most critical network segments, rather than a blurry, wide-angle snapshot of the entire infrastructure.
Tools integrated with the Meraki dashboard, like Splash Access, can leverage this targeted data to provide richer insights. By collecting information from strategically chosen points, you can accurately map the user journey from initial connection via a captive portal to application access, ensuring that performance meets expectations at every step.
Practical Implementation and Actionable Tips
Effective placement requires a good understanding of your network's architecture and traffic patterns. The goal is to gain visibility into segments that are critical for your operations and user experience. A thorough analysis, much like a professional site survey, is the first step to identifying these key locations. For a deeper dive into this planning phase, you can learn more about performing a site survey for your wireless network.
- Retail Chains: Place monitoring points at the store-level internet gateway and before the main PoS server. This helps you quickly figure out if a connectivity issue is isolated to a single location’s ISP or an internal network problem affecting sales.
- Education Campuses: Monitor the aggregation switches that connect high-density areas like lecture halls and libraries to the core network. This allows you to see how traffic from hundreds of student devices impacts overall network performance during peak class times.
- Corporate BYOD: Deploy monitoring at the network entry point for devices connecting via EasyPSK. This provides clear visibility into authentication latency and helps enforce security policies by tracking traffic from personal devices as it enters the corporate environment.
To get started, consider these actionable tips:
- Monitor Choke Points: Focus on aggregation layers, WAN links, and firewall interfaces where traffic from many users converges. These are natural points of congestion and potential failure.
- Place Probes Before and After Critical Devices: Monitor traffic entering and exiting key infrastructure like firewalls or load balancers. This helps you pinpoint whether a device is the source of latency or packet loss.
- Use Cloud-Based Monitoring: For geographically distributed networks, such as multi-site Retail or hotel chains, cloud-based synthetic monitoring tools can test connectivity and performance from the user's perspective back to your core services.
- Monitor Authentication Paths: For networks using captive portals, 802.1X, or IPSK, ensure you have visibility into the RADIUS servers and authentication gateways to quickly diagnose login failures or delays.
4. Configure Intelligent Alerting and Escalation Systems
An overflowing inbox of meaningless alerts is just as bad as no alerts at all. Intelligent alerting moves beyond simple "if-then" notifications, using context and smart logic to separate real threats from background noise. Instead of just flagging a device as "down," an intelligent system understands dependencies. It will notify you only about the root cause, like a core switch failure, rather than spamming you about every connected Meraki access point. This prevents alert fatigue and lets your IT team focus its energy on what really matters.
For guest WIFI environments in Retail stores or on university campuses, this practice is a game-changer. An intelligent alerting system can tell the difference between a single user having a bad connection and a widespread authentication failure with your captive portal. This context-aware approach is a crucial part of effective network monitoring best practices, making sure that critical issues impacting hundreds of users get immediate attention while minor, isolated incidents are prioritized appropriately.
This decision tree illustrates a simplified approach to choosing the right alerting strategy based on your network's behavior.
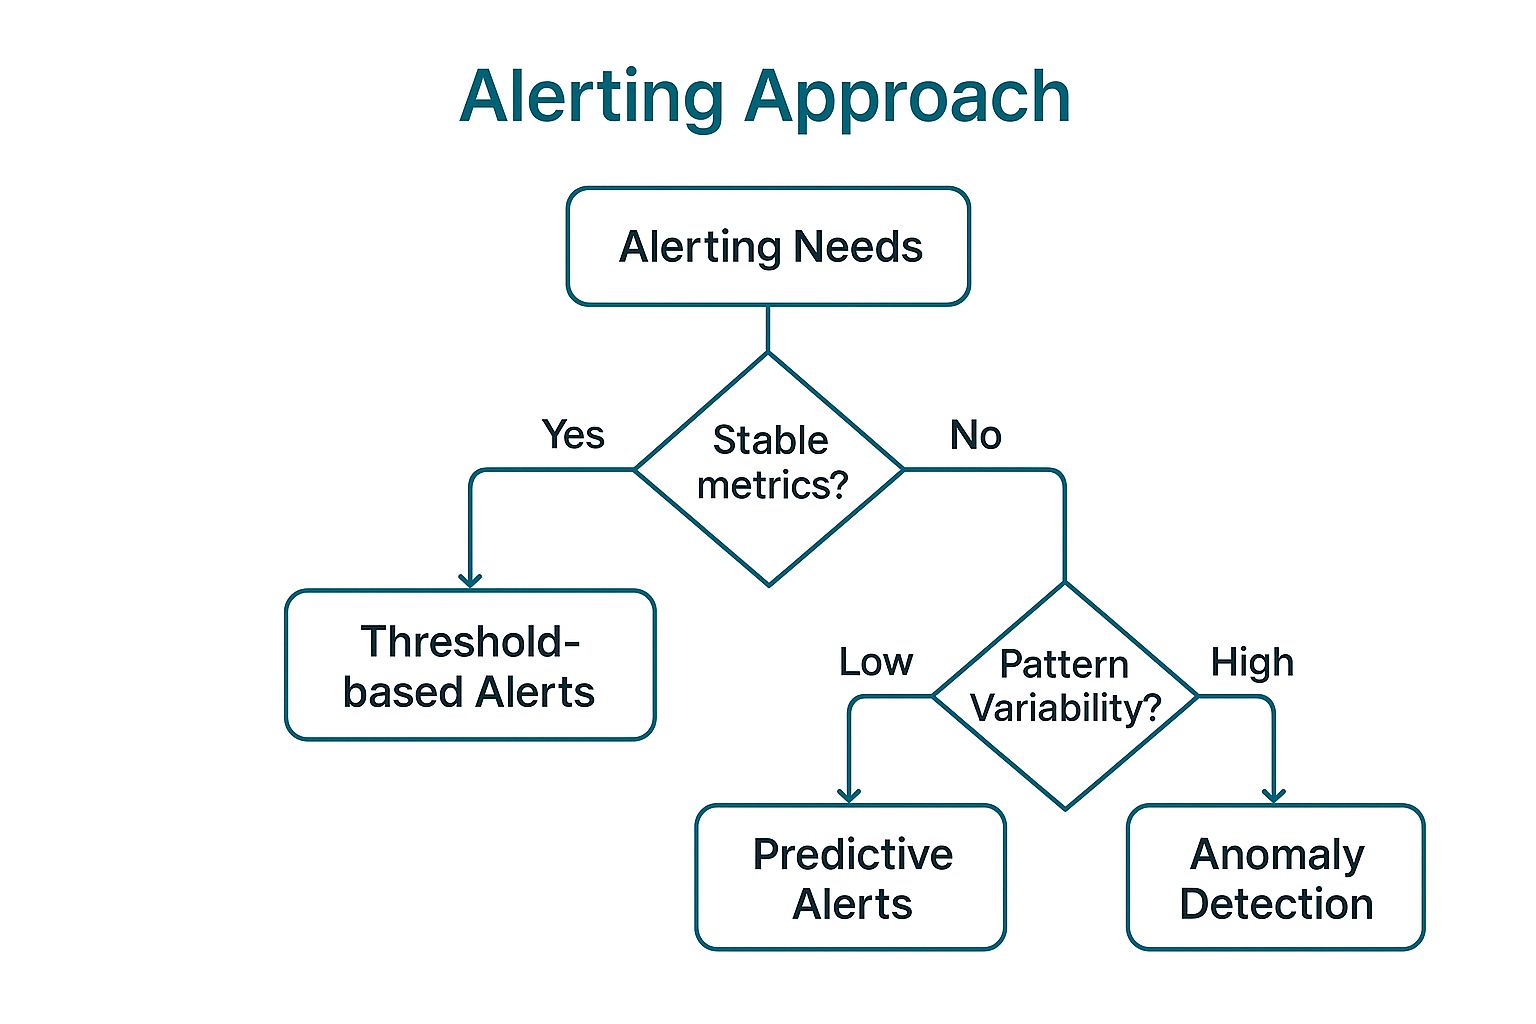
The visualization highlights that while traditional threshold-based alerts are effective for stable metrics, dynamic network environments benefit more from anomaly detection or predictive models.
Why Intelligent Alerting is a Game-Changer
In any fast-paced environment, from a corporate office managing BYOD policies to a busy hotel, the goal is to fix issues before they impact the user. Intelligent alerting systems are the engine for this proactive stance, ensuring the right person gets notified through the right channel with the right information.
Key Insight: Intelligent alerting is about delivering the right signal to the right person at the right time. It cuts through the noise to pinpoint actionable events, turning your monitoring platform into a decisive operational tool.
Modern platforms like Splash Access can integrate with your Meraki network to trigger alerts based on specific business-relevant events. For instance, you could be notified when a VIP guest connects to the WIFI or when EasyPSK authentication failures exceed a certain rate. Discover how you can set up real-time alerting with Splash Access Webhooks to gain this level of control.
Practical Implementation and Actionable Tips
Deploying an effective alerting strategy requires careful planning and continuous tweaking. It's not a "set it and forget it" task.
- Retail Chains: Configure alerts for when captive portal load times exceed your baseline during peak shopping hours. This could signal an issue with the authentication service that needs immediate attention to prevent customer frustration and lost sales.
- Education Campuses: Set up escalating alerts for high-density areas like lecture halls. A minor alert for one or two offline APs might page a junior tech, but if 20% of APs in a building go down, the alert should automatically escalate to a senior network engineer.
- Corporate BYOD: Create specific alert rules for devices connecting via EasyPSK. For example, an alert can be triggered if a device repeatedly fails authentication, which could indicate a misconfigured client or a potential security risk.
To build your own intelligent alerting system, follow these steps:
- Start Conservatively: Begin with higher thresholds to avoid an initial flood of notifications. Gradually tighten them as you gather more data and understand your network's normal fluctuations.
- Map Dependencies: Ensure your system understands network topology. An alert for an offline core switch should suppress the 50 subsequent alerts for the APs connected to it.
- Use Tiered Channels: Send low-priority alerts to an email inbox or a team chat channel. Reserve disruptive notifications like SMS or phone calls for high-severity incidents that require immediate action.
- Review and Tune: Schedule a quarterly review of your alert rules. Analyze which alerts were actioned, which were ignored, and adjust your configurations to improve the signal-to-noise ratio.
5. Maintain Comprehensive Network Documentation
In the world of network management, documentation is often seen as a chore, but it’s one of the most powerful tools you have. Comprehensive network documentation means creating and maintaining detailed, up-to-date records of your network's layout, device configurations, performance baselines, and change history. It’s the definitive blueprint of your digital infrastructure, providing clarity and context that is essential for effective monitoring and speedy troubleshooting. Without it, your team is left trying to figure out a complex system under pressure, wasting precious time during outages.
For dynamic environments like a university campus or a multi-location Retail chain using Cisco Meraki, solid documentation is non-negotiable. It provides the single source of truth for everything from the physical location of access points to the specific captive portal authentication methods (like EasyPSK) assigned to different user groups. This level of detail is a core part of network monitoring best practices, ensuring that any technician can quickly understand the network's design and purpose, which dramatically speeds up issue resolution.
Why Documentation is Non-Negotiable
For any organization managing a guest or corporate WIFI network, documentation turns chaos into order. It moves your team from relying on "tribal knowledge" (which can walk out the door at any time) to operating from a shared, reliable knowledge base. This is crucial for maintaining security, compliance, and operational efficiency.
Key Insight: Excellent documentation turns reactive troubleshooting into a structured, efficient process. It’s the difference between asking "Where is that access point and what VLAN is it on?" and having a diagram and configuration file instantly available.
Tools that integrate with the Meraki dashboard, like Splash Access, can simplify parts of this process by providing clear reporting on user authentication and captive portal configurations. This data becomes a vital part of your documentation, linking user experience directly to network setup. For more insights on how documentation contributes to a secure network, you can learn more about securing your network infrastructure.
Practical Implementation and Actionable Tips
Creating documentation that’s actually useful requires a structured approach that goes beyond a simple inventory list. It needs to be a living resource that evolves with your network.
- Retail Chains: Document the configuration of guest WIFI captive portals, including branding, terms of service versions, and any data collection policies. This ensures a consistent brand experience across all locations and helps with compliance.
- Education Campuses: Maintain detailed logical diagrams showing VLAN segmentation for students, faculty, and IoT devices. Document the EasyPSK or IPSK authentication rules for different user roles to ensure security policies are correctly enforced.
- Corporate BYOD: Keep meticulous records of all security policies, device configuration profiles, and authentication methods applied to employee-owned devices. This is vital for security audits and for troubleshooting connectivity issues for BYOD users without compromising the corporate network.
To get started, follow these actionable tips:
- Automate Where Possible: Use network discovery and mapping tools to automatically generate and update network diagrams and device inventories. This reduces manual effort and minimizes human error.
- Integrate with Change Management: Make documentation updates a mandatory step in your change management process. No change is complete until the documentation is updated to reflect it.
- Use Version Control: Treat your network configuration files like code. Use version control systems to track changes, allowing you to easily review history and roll back to previous stable configurations if needed.
- Include Logical and Physical Diagrams: Document not only how data flows logically (VLANs, subnets, routing) but also the physical layout (rack elevations, port maps, AP locations on floor plans).
6. Implement Proactive Capacity Planning
Thinking about future needs is just as important as managing today's performance. Proactive capacity planning goes beyond reactive problem-solving by using historical data, trend analysis, and predictive modeling to forecast future network demands. It's about making sure your network, especially a dynamic guest WIFI system, has the resources to handle tomorrow's traffic today. This prevents performance slowdowns and ensures you can scale smoothly without service interruptions.
In a Cisco Meraki environment, where new devices and applications are constantly connecting, capacity planning isn't a luxury; it's a necessity. Whether you're managing a corporate BYOD policy with EasyPSK or a public-facing captive portal in a Retail center, this practice ensures you have the bandwidth, processing power, and AP density you need. This forward-looking strategy is a key part of advanced network monitoring best practices, helping you prevent bottlenecks before they ever affect a single user.
Why Capacity Planning is Essential
For any growing organization, from a hospital expanding its telehealth services to a university in the Education sector launching new online learning initiatives, capacity planning aligns your network infrastructure with your strategic goals. It ensures your Meraki network can support business growth, not hold it back. This approach transforms network management from a cost center focused on maintenance to a strategic enabler of new services.
Key Insight: Proactive capacity planning is the bridge between your current network state and your future business objectives. It answers the question, "Will my network be ready for what's next?"
By leveraging the rich data collected through the Meraki dashboard and enhanced by platforms like Splash Access, you get the visibility needed for accurate forecasting. You can analyze long-term trends in user density, application usage, and bandwidth consumption, turning historical data into a reliable roadmap for future network expansion.
Practical Implementation and Actionable Tips
Effective capacity planning is a mix of technical analysis and business insight. It requires a structured approach that considers both current usage and future growth drivers.
- Corporate BYOD: A growing company can analyze connection data for devices authenticated via EasyPSK to forecast the need for additional access points or a bigger internet pipe. This ensures that an increase in employee devices doesn't slow down critical business applications.
- Retail Centers: A shopping mall can use historical guest WIFI data to plan for increased traffic during holiday seasons or special sales events. This allows them to scale their Meraki infrastructure ahead of time, ensuring a flawless customer experience even during peak hours.
- Education Campuses: A university can analyze data from its captive portal to predict the impact of a new online learning platform or a larger incoming student class. This data-driven forecast helps justify infrastructure upgrades and ensures the network can handle the academic load.
To get started with proactive capacity planning, follow these tips:
- Plan for Growth: As a rule of thumb, plan for annual traffic growth of 20-40%. This conservative estimate helps you stay ahead of the curve and avoid being caught off guard by rising demand.
- Consider Event-Driven Patterns: Factor in seasonal and event-based traffic spikes. A hotel needs to plan for full occupancy during a major conference, while a Retail store must prepare for Black Friday.
- Review and Update Regularly: Capacity plans are not static. Re-evaluate and adjust your forecasts quarterly or whenever a significant business change occurs, such as a new building opening or a major marketing campaign launch.
7. Establish Regular Network Health Assessments
While baselining gives you a continuous feel for your network's normal behavior, regular health assessments offer a periodic, deep-dive evaluation of its overall condition. These systematic reviews go beyond daily monitoring, including a thorough analysis of performance, security posture, and infrastructure health. Think of it as a scheduled, comprehensive physical for your network, designed to uncover hidden issues and optimization opportunities before they turn into major problems.
In a guest-centric WIFI environment managed with Cisco Meraki, these assessments are vital for maintaining reliability and security. They ensure that your captive portal authentication methods, whether for public access or secure corporate BYOD using protocols like EasyPSK, are working perfectly. For organizations managing complex networks, these regular check-ups are a core component of effective network monitoring best practices, guaranteeing that the network can consistently support business-critical operations and a high-quality user experience.
Why Scheduled Assessments Are Indispensable
Regular health assessments shift network management from a purely reactive mode to a strategic, long-term approach. For any organization, from a multi-site Retail chain to a large university, these structured evaluations provide the insights needed to plan for future growth, tackle emerging security threats, and justify infrastructure investments.
Key Insight: A network health assessment is like a strategic business review for your IT infrastructure. It moves the conversation from "Is the network working?" to "Is the network configured to meet our future business goals securely and efficiently?"
Tools integrated with the Meraki dashboard, like those provided by Splash Access, can automate much of the data gathering for these reports, creating detailed summaries of user activity, device compliance, and authentication trends. This simplifies the assessment process, allowing IT teams to focus on analysis and strategic planning rather than manual data collection.
Practical Implementation and Actionable Tips
A successful health assessment is a planned, repeatable process, not an impromptu fire drill. It should be tailored to the specific needs and risks of your operational environment.
- Healthcare Organizations: Perform monthly assessments to ensure constant HIPAA compliance, verifying that WIFI access for patients, guests, and medical devices meets strict security and privacy standards. This includes auditing access logs from the captive portal.
- Fortune 500 Companies: Conduct formal quarterly network health assessments to align network performance with business objectives. These reviews often include capacity planning and a security audit of all network segments, including those supporting corporate BYOD.
- Retail and Hospitality: Use assessments to review the performance of guest WIFI marketing and analytics. Verify that data collection via the captive portal is effective and that the network can handle peak traffic during promotional events or high seasons.
To build an effective assessment routine, follow these tips:
- Schedule Smartly: Conduct assessments during low-traffic periods, such as overnight or on weekends, to minimize any potential disruption to users and core business operations.
- Automate Where Possible: Use automated scanning and reporting tools to reduce manual effort and ensure consistency. This allows your team to perform more frequent and thorough checks.
- Create Standardized Checklists: Develop detailed templates for your assessments. Include checks for Meraki firmware versions, security policy compliance, physical access point integrity, and authentication portal performance.
- Track Metrics Over Time: Document the results of each assessment to track improvements and identify recurring issues. This historical data is invaluable for predicting future problems and demonstrating the value of IT initiatives.
7 Key Network Monitoring Practices Comparison
| Practice | Implementation Complexity 🔄 | Resource Requirements ⚡ | Expected Outcomes 📊 | Ideal Use Cases | Key Advantages ⭐💡 |
|---|---|---|---|---|---|
| Establish Clear Network Baselines and Performance Metrics | Medium 🔄 | Moderate ⚡ | Early anomaly detection, capacity insights 📊 | Networks requiring historical performance tracking | Proactive issue detection, data-driven planning ⭐ |
| Implement Multi-Layered Monitoring Coverage | High 🔄 | High ⚡ | Comprehensive visibility, faster problem isolation 📊 | Complex, multi-layered networks and security-focused environments | Broad network coverage, improved security posture ⭐ |
| Deploy Strategic Network Monitoring Points | Medium 🔄 | Moderate ⚡ | Optimal visibility with minimal overhead 📊 | Distributed networks, hybrid/cloud environments | Efficient coverage, low infrastructure investment 💡 |
| Configure Intelligent Alerting and Escalation Systems | High 🔄 | Moderate ⚡ | Reduced false positives, faster MTTR 📊 | Large-scale environments with high alert volume | Context-aware alerts, reduced alert fatigue ⭐ |
| Maintain Comprehensive Network Documentation | Medium 🔄 | Moderate ⚡ | Faster troubleshooting, better compliance 📊 | Networks needing detailed records and audits | Accurate maps, improved planning and audit readiness 💡 |
| Implement Proactive Capacity Planning | Medium 🔄 | Moderate ⚡ | Forecasted resource needs, reduced bottlenecks 📊 | Growing networks anticipating future demand | Cost-effective provisioning, growth support ⭐ |
| Establish Regular Network Health Assessments | Medium 🔄 | Moderate ⚡ | Identifies vulnerabilities, continuous improvement 📊 | Networks requiring regular security and performance reviews | Early issue detection, compliance assurance ⭐ |
From Monitoring to Mastery: Your Path Forward
Navigating the complexities of modern network management, especially in dynamic guest WIFI environments, can feel like a huge task. Throughout this guide, we've walked through a full set of network monitoring best practices designed to turn this challenge into a strategic advantage. We went from the basic need for clear baselines to the savvy approach of proactive capacity planning and regular health checks. The journey from being a reactive problem-solver to a proactive, forward-thinking network strategist is built on these core principles.
Adopting these practices isn't about adding more work to your plate; it's about working smarter. By implementing multi-layered monitoring and setting up intelligent alerting systems within your Cisco Meraki dashboard, you shift your focus from putting out daily fires to engineering a consistently fantastic user experience. This is vital whether you're managing a bustling Retail center, a sprawling university campus with a heavy BYOD policy, or a corporate office where reliable connectivity is everything.
Synthesizing Best Practices for Real-World Impact
The real magic happens when these strategies are integrated and automated. Imagine a scenario on a university campus during finals week. Proactive capacity planning, based on historical data, has already ensured there's enough bandwidth. Strategic monitoring points across dorms and libraries give you a detailed view, while smart alerts, powered up by a solution like Splash Access, notify you of a potential authentication server slowdown before students are locked out. This is the real-world result of moving from simple monitoring to genuine network mastery.
Your Cisco Meraki network is the solid foundation, but integrating it with advanced authentication and management platforms supercharges its capabilities. This teamwork allows you to not only see what's happening but also understand the why behind the data, connecting network performance directly to user behavior through captive portal interactions and Authentication Solutions like EasyPSK.
Your Actionable Roadmap to Network Excellence
Mastering every practice overnight isn't the goal. The path to excellence is taken one step at a time. Here’s how you can start today:
- Start Small, Win Big: Choose just one or two practices to implement this quarter. Begin with establishing clear baselines (Practice #1) to understand your "normal." At the same time, refine your intelligent alerting systems (Practice #4) to cut down on noise and focus on what really matters.
- Document Everything: As you set up baselines and configure alerts, make comprehensive network documentation (Practice #5) a living part of your workflow. This discipline will pay off big time during future troubleshooting and expansion projects.
- Build Momentum: Once your baselines and alerts are solid, move on to proactive capacity planning (Practice #6) and conducting your first regular network health assessment (Practice #7). Each step builds on the last, creating a powerful cycle of continuous improvement.
By embracing these network monitoring best practices, you do more than just maintain a network; you cultivate a digital environment that enables success. You empower students in Education to learn without interruption, provide shoppers in Retail with seamless digital experiences that drive sales, and give employees the reliable tools they need to innovate in a BYOD Corporate setting. The journey from monitoring to mastery is a commitment to excellence, and with the powerful combination of Cisco Meraki and smart, layered solutions, you are perfectly equipped to succeed.
Ready to elevate your Cisco Meraki network with advanced control and analytics? Splash Access enhances your network monitoring capabilities by providing deep insights into user authentication, behavior, and captive portal interactions. Discover how Splash Access can transform your network management strategy today.


